Friday, December 30, 2016

mPOS declare start amount error

Today I will show you how to resolve "Declare Start Amount" error. I've ran into this issue and it took quiet a bit of time to figure out the cause of it.


The cause of this error is when a cashier did a "Blind close shift" and not completely closing their shift. In a sense their shift still exist and we need to close their shift out completely. So what we need to do is add a button in mPOS with the operation "Show blind closed shifts".

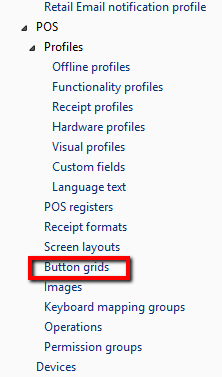
Go ahead and open up AX and browse to: Retail > Setup > POS > Profiles > Button grids.
Once we are in the button grid form we want to select the button grid that we want to place this button in. In my case it was button grid 90. 


We then want to click on "Designer" at the top of the form. We will see a layout design of the buttons. 

Go ahead and click "New button" and that will add a new button to our layout design. 

With the new button we want to right-click and select "Button properties".

In Action dropdown box we want to select Show blind closed shifts.

Then on Text on button give it a descriptive name, I went ahead and name exactly like the action of the button.


Once everything is done go ahead and run 1070 and 1090 job so it can be pushed to the store. If everything is done correctly you should be able to log in to mPOS and your button should be there. What we need to do now is click on the Show blind closed shifts. you should see a list of blind closed shift. What we need to do next is close those shifts. Go ahead and select the shift and at the bottom right corner select Close shift and select Yes.


Once all of that is done you should be able to declare your start amount and do your tender declaration! :D


Thursday, December 29, 2016

Error when closing shift

If you're trying to close a shift, but run into an error stating that you must first declare starting amount and do your tender declaration, then there is a solution to resolve that error.
What we need to do is go into Retail>Setup>POS>Profiles>Functionality profiles. We want to uncheck the box that said "Require starting amounts and tender declaration". Once you have done that go ahead and run 1070 job to push it to the store. The next time you're in mPOS you should be able to close your shift without any error.

Wednesday, December 21, 2016

Error when Delcaring Starting Amount in mPOS

Did you get an error when declaring starting amount in mPOS? Then I have a solution for you!
What happen is when you declare starting amount the system will try and figured out which payment method you are using. If the store is not using the correct payment method then it would throw an error. What we need to do is setup a "Tender Remove/Float" payment method. We can do so by going to Retail>Common>Retail channels>Retail stores> select your store.
Then select Setup tab and select Payment methods.


In this form we want to create a new payment method and select "Tender Remove/Float", and go ahead and fill out the necessary information on the right hand side.

Once that is done we need to go back to the store and set it. Under Miscellaneous>Payment method we want to set it to the payment method we've just created. After that you want to go ahead and run 1070 and 1090 job to push the data to the store level. 

If you do everything correctly then you should be able to declare a starting amount in mPOS without any error.

Wednesday, December 14, 2016

Async Client Troubleshoot

Async Client
Have problem getting Async Client Service running after you have successfully installed the Async Client component?


If you decided to configure the Async Client after you installed the component. This is where things gets weird. Async Client Service won’t be installed if you don’t configure during the setup. Not exactly sure why it does that, but the service will be missing if you don’t do the configuration before the installation.

Let's go ahead and open up MS AX Setup and proceed to where you add/install Async Client component.

We need to go ahead and do our configuration during the setup. If you’re not sure where to get Async Server URL you can check it in the IIS. For Channel database ID, Username, and Password that can be found in AX > Retail > Setup > Retail scheduler > Channel integration > Channel database. If everything is filled out correctly, then you should get a message stating that “connection successful!”


Next we need to point which Message Database the Async Service is talking to. We generally find this in the SQL Server Management. Proceed with the setup.


After the installation completed successfully. We can go into our “Service” and check to see if the service is up and running. If all goes well, then you should be able to see the service, and that’s it! You have successfully installed Async Client and the service that needed to run the client.


How to install Retail mPOS using Powershell

3-21-2017 UPDATE: after speaking with a technical support at Microsoft they have suggested that using powershell to install mPOS is not the best way as it tends to leave out a few features especially the offline service for mPOS. So please ignore this post, and install mPOS using the AX Setup Wizard.

Prereq: Make sure to install mPOS using the AX install media first, but don't configure anything on there just yet.

Run PowerShell as Admin.

Change your directory to: C:\Program Files (x86)\Microsoft Dynamics AX\60\Retail Modern POS\Tools

Then you want to type this and hit enter: .\Install-RetailModernPOS.ps1 -Path "C:\Program Files (x86)\Microsoft Dynamics AX\60\Retail Modern POS"

               1) If you run into an error about "script execution policy" then you want to change the
                    policy by typing in this command. Set-ExecutionPolicy RemoteSigned

more information can be found in this link: https://technet.microsoft.com/en-us/library/ee176961.aspx

2)  If you run the script and you get an error about “group policy” then you need to do the following.

Click start and type run, hit enter.
Then type regedit and navigate to the path indicated from the screenshot. HKLM is short for “host key local machine”.
After changing the “Data” value to 1 then run the script again and it should work.

After successfully installing mPOS you should be able to search for it in the start menu.


Tuesday, December 13, 2016

Hi everyone,

This blog will mainly consist of material from Dynamics AX 2012 R3 Retail. Since I am in the process of learning AX retail I will post my finding or tips and tricks on this blog. This blog will also be a good reference place just in case I need to go back to review the material.


-Duc